The Armstrong 600 Series
Tuner FAQ page
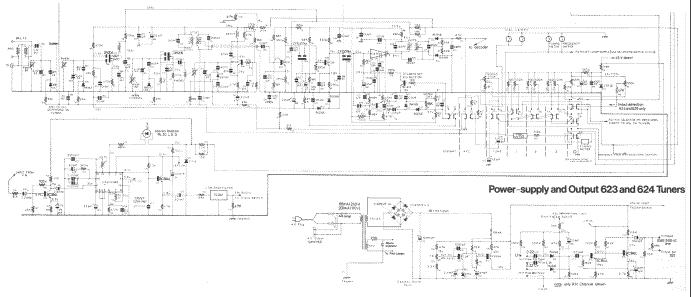
Using the tuner section of 600 range units is fairly straightforward. The tuner section is also less likely to break down than the amplifier since the powers required are lower. However the tuner does have some unusual features that may puzzle the first-time user. Hence this page which tries to answer the most likely questions. Also, tuners do sometime fail, even though this is rare, so the circuit diagram may be of use.
The above image shows the FM tuner, stereo decoder, etc. The same circuits were employed in the 623 and 624 tuners as well as the 625 and 626 receivers. The above image has been scaled down to fit on this page. If you wish to view a larger copy click on the above image. Please note that the image this will fetch is quite large. The AM tuner is discussed on another page, so if you wish to look at the details of the AM tuner click here.
This page will mostly be concerned with explaining how to make use of the FM tuner. Note that the above circuit diagram was subject to modification as part of Armstrong's policy of continuous development. The most significant change during the lifetime of the tuner was a change to a newer stereo decoder, based upon a better PLL IC. The decoder shown in the diagram is the older decoder.
Frequency Asked Questions
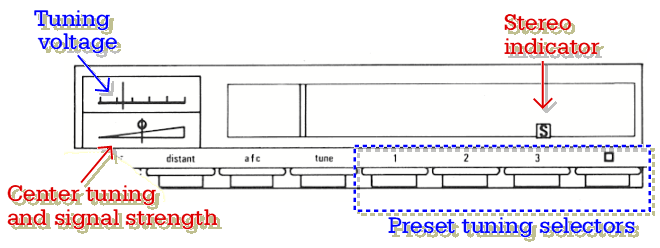
The tuner has two meters, but I can't work out what they do, can you explain? On most hi-fi tuners, the two meters would be for signal strength and for center-tuning. Here, however, they actually serve more functions.
The 600 tuner uses varactor diode tuning. It is unusual in that varactor tuning is used for both the FM and the AM tuners. As a result, both for FM and AM, the station is chosen by applying an appropriate voltage to the diodes in the set. The upper meter indicates the voltage being applied to the diodes, and hence is an indicator of the frequency to which the tuner has been adjusted. The purpose of this meter is to aid you in setting up the pre-sets so that you can switch quickly between up to six stations of your choice.
The lower meter will act as either a signal strength meter or a center-tuning meter, depending upon which tabs are pressed down. When you are listening to an AM station, the meter always shows signal strength. When listening to FM, the meter shows signal strength when the AFC tab is down, but acts as a center tuning meter when the AFC tab is up. When tuning manually on an AM/FM set, pressing down the ‘square’ tab button at the far right end of the row selects AM tuning instead of FM. To tune FM manually you should ideally proceed as follows:
First ensure the AFC tab is up. If its down, press and release it to allow it to toggle upwards. The lower meter now indicates frequency tuning accuracy. When manually tuning, the main tuning scale will be lit so you can use the scale to see the frequency to which you are tuned. Adjust the tuning knob until you are at about the correct frequency and the station you want is audible. You can now use the center-tuning meter to ‘fine tune’ accurately. Then press down the AFC tab and it will lock on to the station. Since the set is now locked on you don't really need to see how well it is tuned, so the lower meter now changes to display the signal strength. In practice with strong stations you often don't need to fine tune with care as the AFC will do the job for you. However this is up to you.
How do I adjust the presets to allow me to quickly select between six stations of my own choice? Three of the presets are selected by pressing down one of the tab buttons, numbered 1 to 3. By pressing down the ‘square’ tab, the numbered tabs can be used to select three more presets. On an FM only tuner or receiver all six presets are for FM. On an AM/FM set, the three presets with the square tab up are for FM, and the three with the square tab down are for AM. Since the AM tuner covers both medium and long wave in one band the presets the AM presets can be used for long or medium wave stations as you prefer.
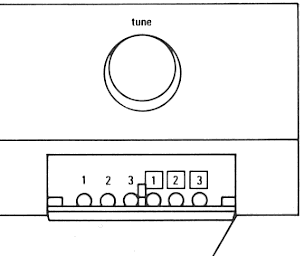
To set the presets to the stations you prefer you need to use a small screwdriver to adjust each of the six multi-turn potentiometers which are hidden under a small flap at the bottom right of the front of the set. Note that these are numbered 1 - 3 to indicate which tab they relate to, and that three have a square around the number to indicate they relate to the numbered tab when the square tab is down. The image below shows the preset potentiometers under the main tuning knob with the covering flap hinged down.
First switch to manual tuning by pressing down the ‘tune’ tab. Then tune to the station you desire. Make a mental note of the tuning voltage indicator reading. Now press down the numbered tab for the preset you wish to tune to the station you have just manually tuned. Use the screwdriver to tune the appropriate preset to give the same reading on the upper meter that shows tuning voltage. The station should now be audible and you can fine tune using the lower meter to indicate signal strength or center tuning. Once this is done, the chosen preset will always select the station you have chosen when the correct tab is pressed down. You can now repeat the process for each tab, using a different preset pot to adjust the selected frequency in each case.
Once the above process is done you can essentially use the manual tune independently of the six presets. When you select a preset station the main tuning scale lights will go out as the scale is not required.
What does the distant tab do? This does two things when pressed down. However it only acts upon FM inputs. Firstly, it disengages a mute that otherwise turns off the output of the tuner when there is no tuned station, or when the input signal is weak. As a result of this mute, when the distant tab is up, interstation hiss is suppressed, and weak noisy stations won't be heard. When you press down the distant tab the mute is disengaged. This may be useful when you want to listen to weak stations. You may find you prefer to press down the ‘mono’ tab when listening to a weak FM station as this may reduce the level of the background noise.
The distant tab also alters the sensitivity of the signal strength meter. Note that it does not alter the gain or sensitivity of the actual tuner since these always adjust automatically by themselves. The change in meter scale is purely to help when trying to tune a weak signal as otherwise the meter deflection may be too small to be easily seen.
What output does the 623 or 624 tuner provide for connection to an amplifier? The outputs come via a 5-pin DIN socket on the back of the tuner. In fact, outputs are provided at two signal levels.
- Pin 1 is a left hand channel output, high level
- Pin 2 is the ground (earth) connection
- Pin 3 is a left hand channel output, low level
- Pin 4 is a right hand channel output, high level
- Pin 5 is a right hand channel output, low level
The pin numbers are usually embossed on DIN plugs. If you are not familiar with DIN plugs and sockets, please note that the order of the numbering probably isn't what you expect, so check before connecting!
In the above ‘high’ corresponds to an output of 775 mV into a 600 ohm load when receiving 100 percent modulation. The ‘low’ output corresponds to 100 mV with 30 percent modulation with a 68 kOhm output impedance. For most modern amplifiers the use of the high output is recommended.

Content and pages maintained by: Jim Lesurf
using HTMLEdit and TechWriter on a StrongARM powered RISCOS machine.


