Testing Testing...
It is quite common for someone to wish to be able to test audio equipment in various ways. In general this is done by supplying the item with a suitable input waveform and then seeing what output this produces. There are many ways to carry out this process, and professional tests often require expensive specialist measurement equipment. However home measurements can be done with quite simple kit. This article is to illustrated how they can be done using a CD player and a recorder. As on previous occasions, there are a couple of applications to accompany the article. These are called !StepGen and !TrackSteps. Click here for a 25kb zip containing these RISC OS applications.
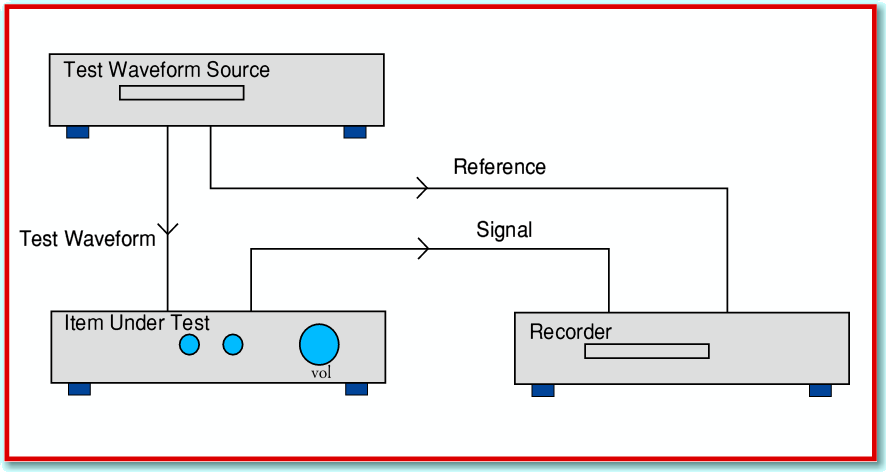
In order to make decent measurements we generally have to ensure that the input waveform is well defined, and as we intended. It is also often a good idea to arrange to make measurements using a ‘comparison’ method. i.e. to arrange to be able to compare the input waveform with the output side-by-side. This approach is illustrated in figure 1.
Figure 1
The waveform source provides two copies of the waveform. One of them is applied to the input of the item being tested. The other is taken directly to our measurement system – here represented by a recorder of some kind. The output from the item being tested is also fed to the measurement system (recorder). The direct connection from source to recorder provides what is often called a ‘reference’ which we can then compare with the output from the unit under test. Once the recording has been made, it can be loaded into a computer for analysis.
Here I’ll assume that our interest is in checking the frequency response of the item being tested. This means that we want to know how the amplitude (or power) and phase (or time delay) of the output signal depends on the test waveform frequency. Conceptually, the simplest and most obvious way to do this is to play a series of tone bursts. i.e. a sequence of sinusoidal tones, stepping the frequency from each tone to the next. This is where one of the applications I have provided comes into play. !StepGen allows you to create an audio (data) file in a format suitable for CDBurn/CDVDBurn to write to an Audio CDR or CDRW. The full details of how to use !StepGen are in a Help file inside the application. Once you have created the Audio disc you can turn a CD Player into a test waveform generator by using it to play the disc. One stereo channel from the player can supply the input for the item under test, and the other can provide the reference going directly to a recorder or other measurement device.
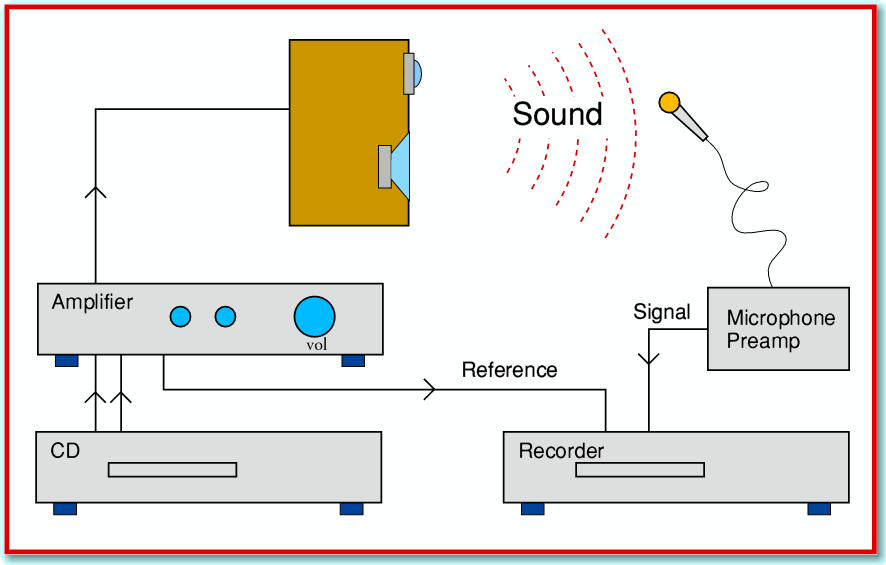
Although this process is a general one, my interest was to make measurements on the behaviour of a loudspeaker in a room. The aim being to examine the effects of room acoustics and to check out speaker performance in a domestic situation. I therefore used !StepGen to produce some stepped sequences on a CD and then connected up a system as shown in Figure 2.
Figure 2
This setup is more complicated than the one shown in Figure 1. I wanted to study the behaviour of the speaker and room, not the amplifier. But I need to use an amplifier to drive the loudspeaker. So in this case the reference was taken from the ‘tape output’ of the amplifier system. I also had to use a microphone and preamplifier to gather the output from the speaker and room. Clearly, this means that any alterations made by microphone imperfections will also appear in the result.
For the experiments I used an Audio CD recorder to gather recordings of the reference and signal. However you could use alternative arrangements. For example, you can buy inexpensive sound level meters from some electronics companies like Maplin or CPC. Some of these provide an ac output which can be recorded, or you can just make a note of the levels they display. But in my case, I generated a set of recordings on a CDRW Audio disc and used CDBurn to transfer them as audio data files onto the hard disc of my Iyonix. I then needed some way to analyse the results. This is where the second application, !TrackSteps, comes in.
The details of how to use !TrackSteps are in a Help file inside its application directory. However the process can be explained fairly simply. !TrackSteps functions in two stages. Stage one is to run though the audio data file and generate a ‘profile’ which allows it to determine where each tone burst starts and finishes. It does this by examining the stereo channel used to record the reference. This means the process isn’t upset by problems like any noise in the room that might be added onto the signals recorded using the microphone.
Having produced the profile it loads a 1 second chunk of the file from each of the tone bursts it had found. It then uses a frequency counting method to determine the frequency of the sinusoidal tone of each burst. (This also uses the reference to avoid being affected by any unwanted problems with the signal.) Once the frequency is determined, and its first cycle located, the application uses a Fourier Transform to work out the power and phase of the any pattern at that frequency on both the reference and signal channels of the recording. This allows it to determine the relative power and phase of the signal picked up by the microphone. One nice feature of this approach is that any background noise at other frequencies will tend to be ignored! In essence, the Transform acts like a narrow-band filter with a bandwidth of around 1 Hz, centered on each test tone’s frequency. Hence you can get quite accurate results without the room being totally isolated from other noises.
Figure 3
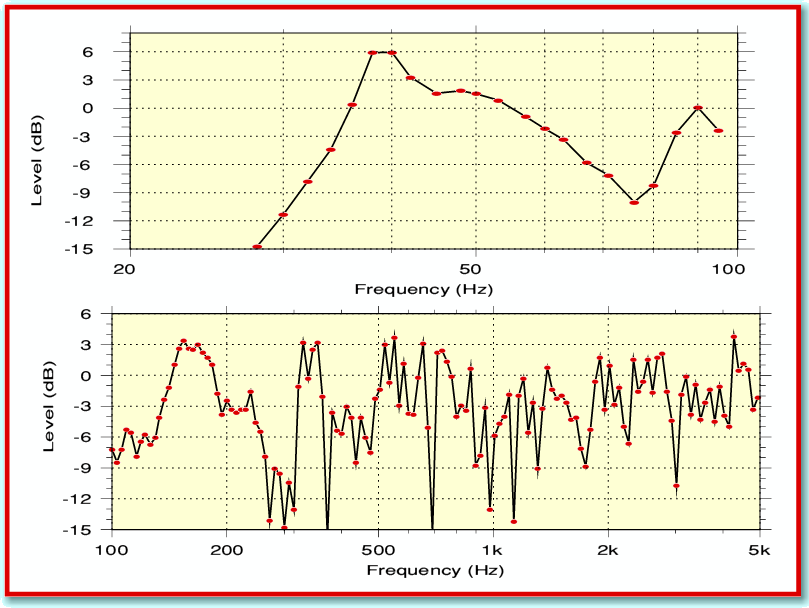
Figure 3 illustrates the kind of results this can provide. These plots are based on two stepped sequences. One covering the range from 20Hz to 100Hz, the other from 100Hz to 5 kHz. Note that the gain was set differently in the two cases. The plots show the changes in sound power picked up as a function of frequency. If you have never seen results for sinewaves in a room you may find these graphs quite a shock! The loudspeaker I used for these measurements is a QUAD ESL63 which is well known to have a very smooth, flat frequency response. Yet the measured results make the Alps look like a billiard table! The reason for this is that the reflections of sound around the room have a quite drastic effect. Room acoustics is a notoriously difficult topic, and the effects of most real domestic rooms are a nightmare to analyse. Because of this behaviour, most of the measured results you see in audio magazines have been made in ways that try to avoid including just what the listening room does to the loudspeaker output. I may say more about that in a later article, but here I was interested in seeing what the room was doing.
Figure 4
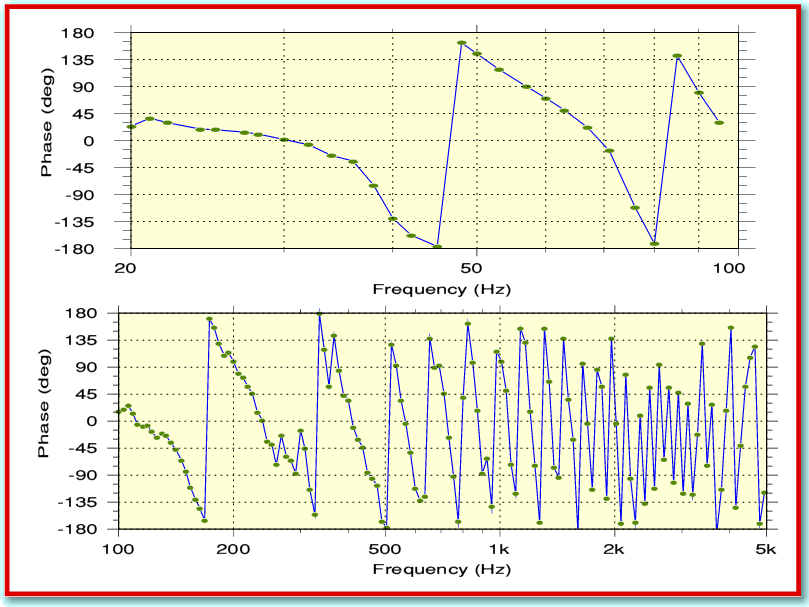
Since we have the reference recorded alongside the signal we can also compare them to determine the phase (time delay). Using the same measurements as above this gave the results shown in Figure 4. Again, the plots may look alarmingly bad given that the ESL63 should have an almost uniform phase behaviour. Once again, the room is a culprit here. However, also remember that the sound takes a finite time to propagate across the room from speaker to microphone. This propagation time delay produces a phase lag which increases with frequency.
Although here I’ve used !StepGen and !TrackSteps for looking at the behaviour of room acoustics you can use them for various other purposes. The basic requirement is to be able to produce Audio CDs and record results onto them. If you can do that you can then use the applications along with a CD player and recorder to analyse the response behaviour of an item of audio equipment. You can also use some of the other applications in the Track series – e.g. use !TrackTHD or !TrackFFT to examine the results for distortion.
Jim Lesurf
1400 Words
2nd Jan 2009


