Ideally, all sound recordings would be made using excellent equipment and with the necessary care and skill. Alas, in reality the results are sometimes technically flawed, but the content is of great interest for historic, personal, or musical reasons. In such cases we may have to try and ‘rescue’ the content and try to abate any audible effects of the technical problems. A common cause of problems is that the signal/noise ratio is poor. For example, many old recordings on 78RPM discs may have a very noticeable noise level. In some cases this can be so audible that it seems to be stretching a point to call it ‘background noise’!
If you have bought CDs of the kind called ‘historic’ in magazines like The Gramophone you will have noticed that modern transfers have often been processed to try and reduce the audibility of the noise whilst leaving the wanted sounds unaffected. Early systems that did this were fairly crude and didn’t always work well. The result being that the noise could still be distracting, but the wanted sounds were altered in audible ways. However more modern systems like the commercial ones sold under brand names like ‘NoNoise’ and ‘CEDAR’ can produce quite remarkable improvements. Sometimes revealing musical details no-one listening to the 78RPM disc would have ever heard!
Just over 20 years ago I made a series of (cassette tape) recordings. These were of conversations with my parents where the recalled their lives and experiences. For obvious reasons these recordings are quite precious for my in personal terms. One example is a tape made of my Father shortly before he died. In it he recounts stories of his life back in the 1920s and earlier. Most of the recordings I made were of decent technical quality and produce realistic results when played. But this one has a serious audible defect. I had decided to experiment with some better quality microphones without realising until afterwards that the were much less sensitive than the ones I’d previously used. Unfortunately, the recorder had no meters to show me the sound level. The problem wasn’t obvious on headphones at the time as I was too involved with the conversations being recorded! When I played back the tape later I realised that the recording was so faint that it was almost drowned in tape noise. I then quickly made a low-noise amplifier to boost the signal level into the recorder. This meant later recordings were much better, but it was too late to fix the one recorded at low level!
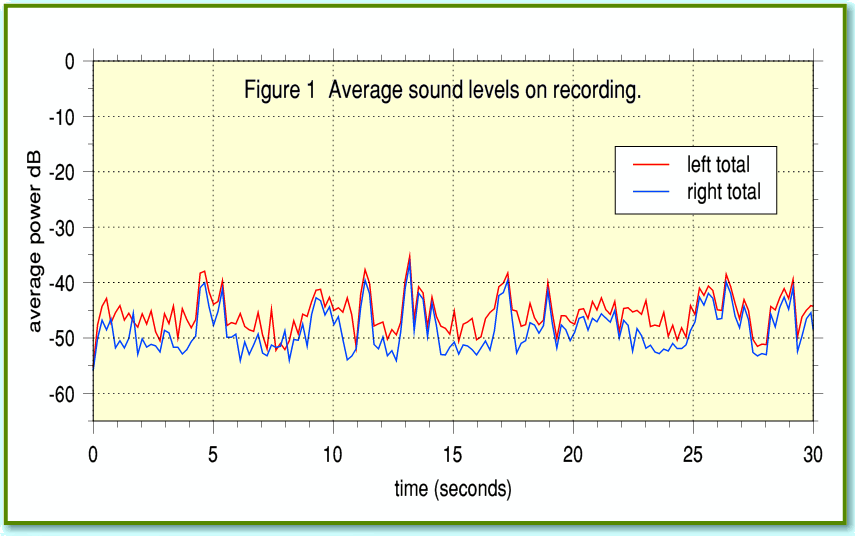
To illustrate the problem Figure 1 shows the average sound levels during the first 30 seconds of the recording. To obtain this I copied the tape to CD, then loaded the data onto my Iyonix and used TrackFFTScan to get the values for the average power as a function of time. In fact I used a new, slightly improved version of TrackFFScan for this. It works like the original but has some bugfixes and provides some more info. I have therefore given Jim a copy to make available, so if you wish you can use this new version instead of the old one. From the user’s point of view, it behaves just like the earlier version, but provides one extra series of values in its output. This is an alternative value for the signal frequency during each transformed chunk of data produced by counting the number of zero crossings. The method used for this is the same as I’d previously used for the TrackTHD application. For some periodic signals this extra set of values is useful information, but for speech or noise the values are generally meaningless. Hence the differences between the old and new versions of TrackFFTScan are irrelevant for this article.
Looking at Figure 1 we can see the problem. When I or my Father were speaking the sound level is only about 10dB above the background noise! The tape noise level is at about -50dB, but the recording is so faint that the speech is only slightly louder. In practice we tend to need a wanted signal to noise ratio of more like 40dB or more for background noise to be so faint as to pass without notice. Ideally, even larger signal/noise ratios would be preferred for high quality results.
In principle, you can always amplify a low-level signal. So if there were no noise I could simply use TrackGain to get a louder result. Alas, boosting the level like that makes the noise louder as well, and the result is annoyingly loud noise along with the wanted speech. What is really wanted is some way to magically discriminate between the wanted speech and the unwanted noise, so we could boost one whilst suppressing the other.
Some of the early systems for trying to reduce the audibility of noise tended to work by methods like ‘noise gating’ and ‘level expansion’. Noise gating means that we choose a ‘threshold’ power level and simply suppress the sound whenever it is below this level. The idea is that the noise is at a lower level than the wanted sound, so this removes the noise whenever there are no wanted sounds. In effect, the signal is switched on or off depending on the level. This can work reasonably well if the wanted sounds are somewhat louder than the unwanted noises. But it runs into difficulties when this isn’t the case. The risk is that low level wanted sounds tend to be cut off as they fall below the threshold, and/or louder sections of noise are allowed though. Even when the signal is loud there is a tendency for the result to sound ‘clipped’ as the beginnings and ends of wanted sounds get snipped away. There can also be an annoying tendency for the noise to still be audible whilst the wanted sounds are present. Indeed, this can be more annoying than simply listening to the unprocessed noisy original since the noise turns on and off with the wanted sounds in a distracting way!
Level expansion is essentially a gentler version of the noise gating. Instead of abruptly turning the signal on and off, the gain is varied according to the sound level so that changes are made greater. The idea being that the noise is quieter than the wanted sounds, and this will make the difference larger, reducing how noticeable the noise will be. Unfortunately, the result tends to be a ‘breathing’ effect when the sounds can be heard to keep going up and down in loudness. Also, changes in the speaking level become exaggerated. Again, the result can be more annoying than simply putting up with the noise. Both the gating and expansion therefore tend to only work well if the wanted signals are somewhat louder than the noise. This means they can be a bit like an umbrella that only works if it isn’t raining very much!
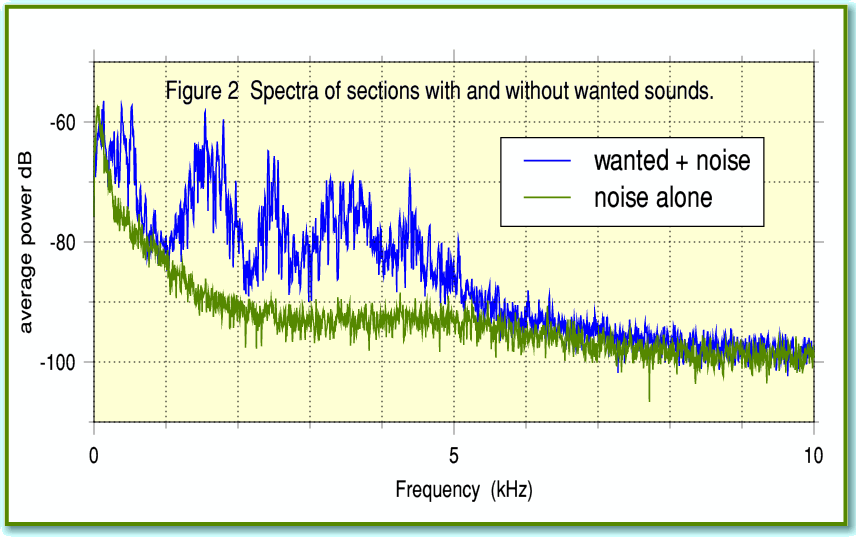
The good news is that modern techniques can do better by making use of the FFT. To understand why this is the case, look at Figure 2. I used TrackFFTScan to obtain the spectra for two sections of the example recording. One was during the first couple of seconds whilst no-one was speaking (shown in green). This shows the average spectrum of the unwanted noise. The other (blue line) was when we were speaking and a wanted signal was present. For the sake of clarity I have only plotted the spectra for the right-hand channel of the stereo recording. By comparing the two we can see that in many places the wanted signals produce spectral components that are much more than 10dB above the unwanted noise.
Note also that although Figure 1 shows levels of around -40dB to -50dB, Figure 2 shows much lower levels. This is because the power of the signals or noise shown in the spectra have been divided up and spread over a number of frequency ‘bins’. One of the properties of random noise is that its power tends to be spread over a wide range of frequencies. Whereas speech and music tends to have a structure that often concentrates its power at a limited set of frequencies. We can therefore exploit this to improve our ability to distinguish noise from wanted speech or music.
In fact, the Fourier Transform, and its speedy cousin the FFT, can be used in two directions. Given a pattern of variations with time we can transform this to work out spectra like those shown in Figure 2. Similarly, given spectra, we can use an ‘inverse’ transform to work out the time patterns that the spectra represent. Once we know this we can imagine trying to remove noise from a recording as follows:
1) Take the recording and break it into chunks (as carried out by TrackFFTScan).
2) Analyse the spectra of each chunk and compare them with what we’d expect for background noise alone.
3) Set to zero any spectral components which are at the noise level, but leave alone any components whose power is clearly bigger than the noise.
4) Take these ‘weeded’ spectra and inverse transform them to work out the equivalent time-varying patterns.
5) Stitch the resulting ‘weeded’ chunks back together to form the processed output.
If all is well, the result will be a new version of the recording where much of the noise has been removed, but most of the wanted signals have been preserved. The above is the basic method behind many of the most successful noise suppression systems used for audio. However you may have noticed that I haven’t provided an application to do this along with the article! The reason is that there are some potential snags and complications. I’ll examine them in a future article, and – with luck! - eventually provide an application that carries out the above process.
Jim Lesurf
1650 Words
12th Apr 2008


