When it comes to audio, Linux users tend to encounter a bewildering array of ‘sound systems’. Pulse, Esound, Jack, etc, etc. And “Sound doesn’t work properly!” seems a common annoyance. The American composer, John Cage, wrote two works for piano where the pianist comes on stage, sits down, and plays... nothing. Admittedly, he has to play it with great skill. Maybe Cage had just installed an exciting new distro on his new computer and wanted others to share the experience...
Alas, along with the multiple-choice question presented by all the sound ‘layers’, there is a lack of clear and well organised user-documentation. So the purpose of this article is to make it easier for you to get audio working as you choose. To do that, I’ll focus on ALSA. Once you have the hang of that, you can listen to the music and join me in regarding Pulse Audio as an irritating computer virus.
ALSA (Advanced Linux Sound Architecture) is the glue that links hardware to software. One of the main tools it provides is alsamixer, so lets start with that. If you open a terminal, type in alsamixer, and press the return key, the display in the terminal window will change to look something like Fig 1
Figure 1 - Typical initial alsamixer window.
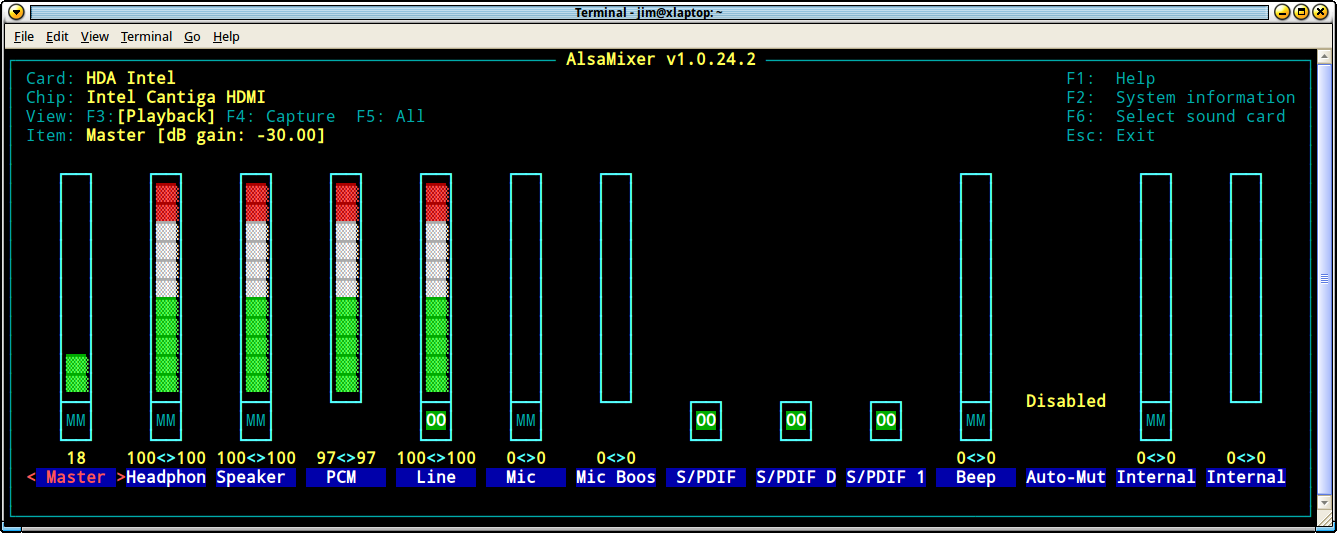
Initially, alsamixer tries to display all the playback settings it can control. However you may notice a vertical set of ‘>’ characters at the right-hand side of the terminal window. These indicate that there are more controls, hidden off to the right. Widening the window produces Fig 2 where all the playback controls are revealed..
Figure 2 - The wisdom of the Krell revealed.
Each item has a label at the bottom of the display. In this case, reading from left to right the names are Master, Headphon(e), Speaker, PCM, etc... The details will depend on your computer’s hardware. For this illustration I’m using my Acer Laptop. The currently selected item is highlighted in red and bracketed with the ‘<’ and ‘>’ characters. Here it is a ‘Master’ playback level. Items which represent something like a volume or gain level that can be altered are shown as a sort of vertical thermometer. Items with no thermometer can only be switched, not have a level altered. At the base of most thermometers is a box which shows either ‘MM’ or ‘OO’. This represents whether that level is Muted (MM) or On (OO). Note that if the ‘Master’ is muted (as shown here) you may get no sound playback at all, regardless of any other settings!
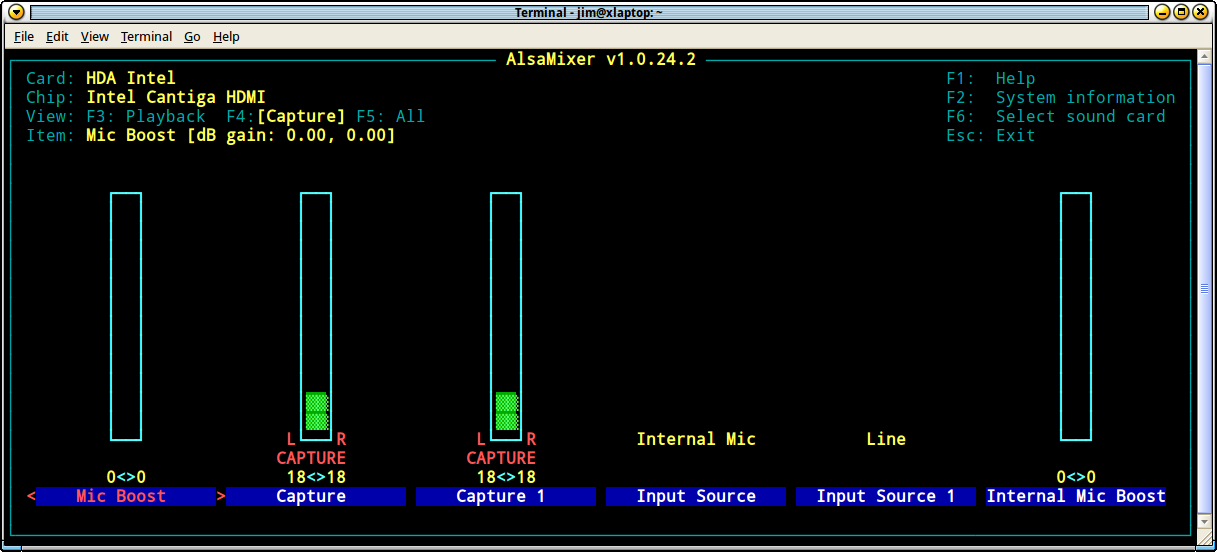
Above the line of playback controls there is some other information. This includes a list of function keys that alter what is being displayed by alsamixer. For example if you press the F4 key the display will change to show the sound ‘capture’ – i.e. input – controls, and look something like Fig 3.
Figure 3 - Display of capture (i.e. recording inputs) controls.
Again, bear in mind that your computer hardware may well differ from the laptop I’m using here, so you may see a different set of named items.
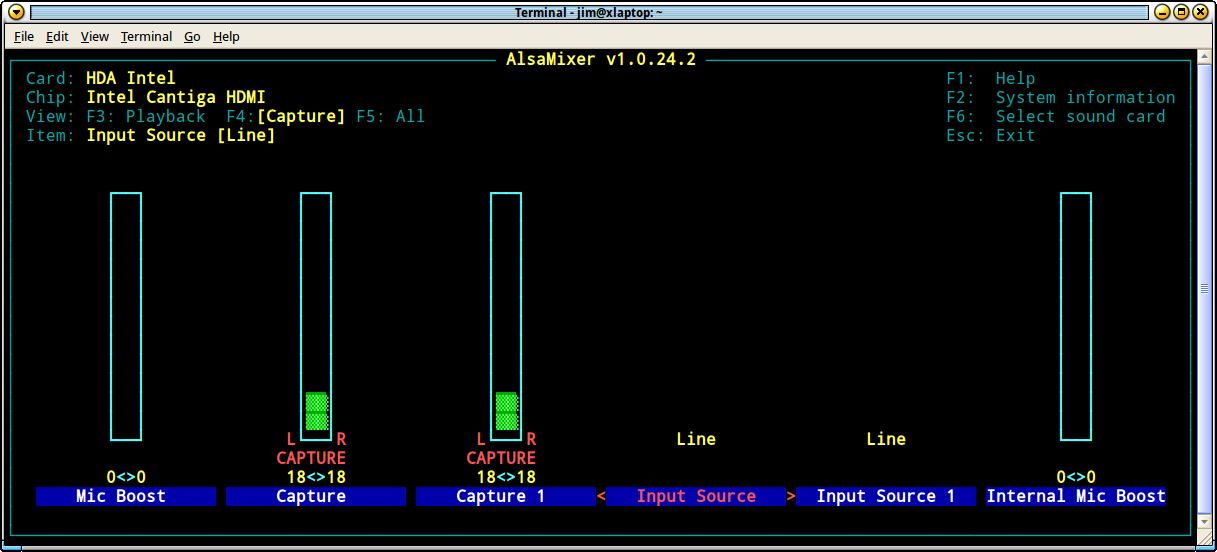
Figure 3 shows the ‘Mic Boost’ setting currently selected at the left. The thermometer is at the bottom of its range. If you look at the top-left of the window you can see Item: Mic Boost [dB gain 0.00, 0.00]. This tells us the nominal gain setting value for the selected item at present. To see how we can alter settings using the keyboard I’ll use an example... First, I pressed the right-arrow key three times. This moved the selected item three steps to the right and highlighted ‘Input Source’. I then pressed the up-arrow key and the displayed value for this item changed from ‘Internal Mic’ to ‘Line’. The result is shown in Fig 4.
Figure 4 - As Fig 3 but having changed the Input Source.
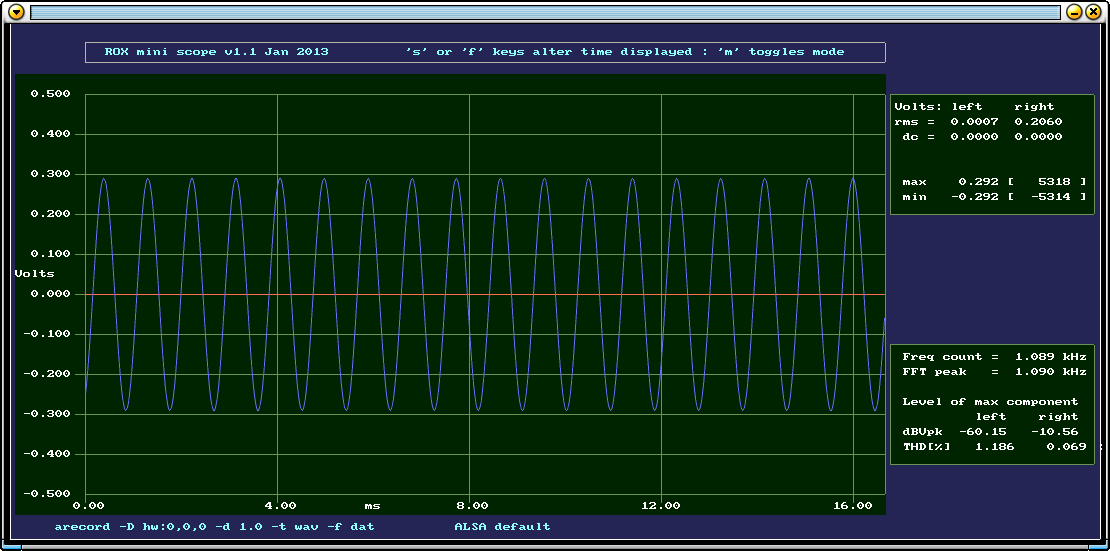
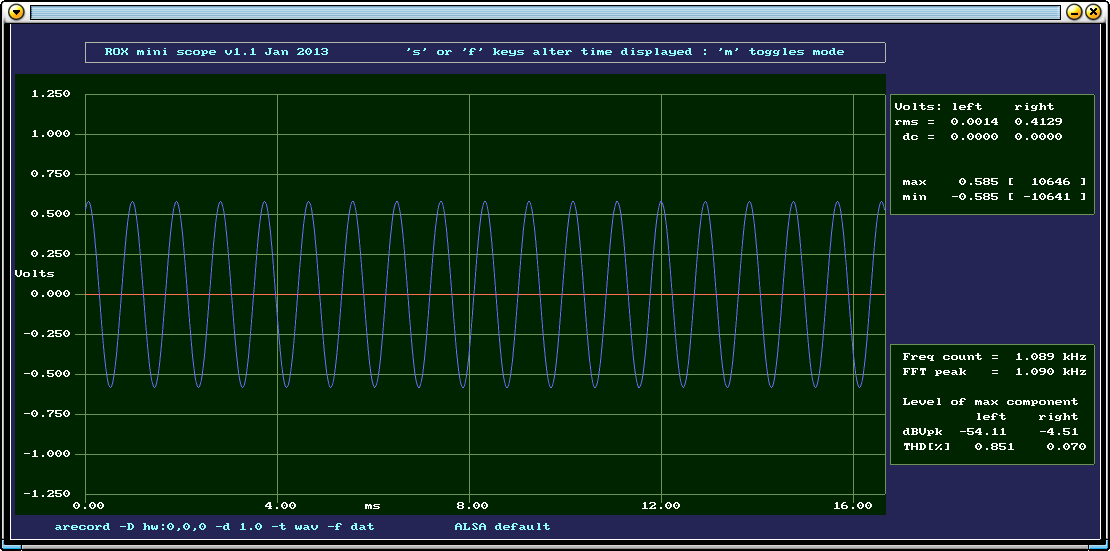
If I now press the ‘Escape’ key I exit alsamixer having changed one of the input source selections from being the laptop’s internal microphone to its ‘Line’ input socket. Having done this I attached an audio signal generator to one of the stereo channels of the Line input socket. (Which for my laptop is a small stereo jack similar to the type used for headphones.) I then ran my ROXminiscope application to display the input shown in Fig 5.
Figure 5 - Input being captured using ROXminiscope.
The oscillator was providing a 200 mV rms, 1kHz sinewave into the right-hand channel of the Line input.
ROX rocks!
If you want to experiment with ROXminiscope or ROXscope, you can get them from http://www.audiomisc.co.uk/software/index.html . You’ll also find various other audio and video programs there. One of these is ROXtone, which lets you test being able to play out audio.
The ROX application programs are primarily designed to run on the ROX-filer desktop. But they should also run with other Linux desktops in the usual ways. Each ROX application comes with a help file to explain more. The source code is included in case you want to modify or improve them to suit your preferences.
I tend to use ROX on top of xfce, but it works with various window managers, and is available from many distribution repositories. Have a look at http://rox.sourceforge.net/desktop/ if you want to know more about ROX.
|
You can do a similar test using the output from something like a CD player. In fact, once you know how to take control using ALSA you can actually use the same computer to play sounds out, and connect them back into a ‘capture’ input. Then see them displayed or record them. But having tempted you with that, back to the plot...
If I run alsamixer again in a terminal I can use F4 to go to its capture display and alter another setting.
Figure 6 - Pump up the level.
Although it isn’t stunningly obvious at first glance, some controls relate to one another. In this case the ‘Capture’ thermometer controls the gain level for the selection above ‘Input Source’, and the ‘Capture 1’ thermometer controls the gain level for the selection above ‘Input Source 1’. For the sake of illustration I decided to alter the gain setting for the ‘Capture’ input. To do this I used the right-arrow key to go to the ‘Capture’ setting. Then used the up-arrow key to increase the setting’s value. If you compare Fig 6 with Fig 4 you can see that the number of (green) squares stacked in the ‘Capture’ thermometer has increased, and the values at the bottom have changed from 18 to 28. At the top-left of the window the ‘Item:’ now shows Capture [dB gain 6.00, 6.00]. Before I altered the value it showed 0.00, 0.00, so I’ve nominally increased the gain of the Input Source (which I have set to Line) by 6dB. Pressing escape to close alsamixer and running ROXminiscope again I now get the result shown in Fig 7.
Figure 7 - ROXminiscope display now.
The input signal level seems to have doubled in magnitude! Previously it was shown as 206 mV rms. Now it is shown as 412 mV rms. (Electronics engineers won’t be amazed as they will know that +6dB means double the voltage. You can tell an engineer here because they’ll assume this is ‘obvious’.) However, despite this change in displayed level I know the actual input being fed into the Line socket is the same as before. In fact I’d had already calibrated ROXminiscope on my laptop while the ‘Capture’ gain was set to 0dB, not 6dB. So winding up the gain makes it over-estimate the input voltage. What the ‘Capture’ level actually controls is the amount of gain boost applied by an amplifier in the laptop’s hardware, scaling up what we find when we look at the result presented to user software like ROXscope.
The change shows that I was successful in using alsamixer to alter the gain the laptop sound card hardware applied to the input. The names and values for your machine may be different, but you can use the same approach to alter settings to select inputs (capture), outputs (playback) and to adjust gains.
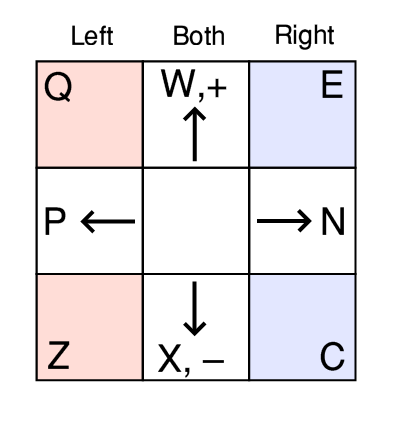
Figure 8 - The magic square: A diagram of alsamixer keys.
Alsamixer actually provides a number of keys to make changes via the keyboard. The diagram in Fig 8 may be useful in helping you to recall some of them. e.g. As alternatives to using the up-arrow to increase the gain of a selected item or change a setting you can use the ‘W’ or ‘+’ keys. ‘P’ will shift the selected item to the left (Previous) and ‘N’ to the right (Next), etc. If your sound hardware allows it. the ‘Q’, and ‘Z’ keys alter the left-channel of a stereo pair independently of the right-channel, and ‘E’ and ‘C’ alter the right channel values. Also, the number keys from ‘0’ to ‘9’ jump the selected gain to preset levels. Pressing ‘M’ will switch a control between being muted and unmuted. This particular control is one to keep an eye on. Otherwise you can spend ages fidding with levels and settings and being frustrated by still getting no output. In the process coming to feel you know why ALSA is an anagram of ‘alas’!
Take Control
You can use the alsactl command to save or load alsa settings that you have created or altered with alsamixer. For example,
alsactl -f new_alsastate store
which will save all the current settings to a file called new_alsastate, and
alsactl -f new_alsatate restore
that loads the settings again.
Before experimenting with alsamixer, use this to save (i.e. store) your initial settings to a file. Then you can restore the original state if you get into a mess! The command also gives you a way to store a series of files defining various alsa states, and switch between them. This can be useful if there are a number of audio tasks you wish to perform that require different sound system settings.
Should you become more expert with ALSA then you may find it useful to examine the contents of the alsa state file(s) you have saved. Once you know what you are doing, these can be edited and then ‘restored’ to tweak the setup and make changes that alsamixer doesn’t offer. But take care if you try this and have a safe backup file to restore in case of trouble!
As usual, man alsactl for more details.
Tip: If you have a problem getting your machine to accept or remember changes made with alsamixer or alsactl, then try using sudo to run them. Some distros may otherwise block changes or ‘lose’ them during a power cycle. But remember to always take extra care when using sudo!
|
Testing playback or recording/capture.
To test behaviour, ALSA provides two simple commands you can issue in a terminal window. If you want to check which of the computer’s outputs will be used by ALSA to play audio you can use the aplay command. To do this you need a short wave file to play. I’d strongly recommend you use a stereo file with a sample rate of 48,000 samples/sec (48k) if you can. This is because 48k has generally been the default standard for computer hardware. Failing that, use a file with a sample rate of 44·1k (e.g. from an audio CD) as this will probably be OK. When doing initial tests avoid using mono files, or ones with other sample rates as they may not work for other reasons. For the same reason, stick to plain stereo Wave files when starting tests.
Start by navigating to a directory which contains a suitable wave file. I’ll assume this is called fred.wav, but replace that in what follows with the name of your test file. Open a terminal and enter the command
aplay fred.wav
and press return. This should play the audio file via the ALSA selected audio output. In the process the level may be scaled up or down in volume by the relevant gain, set by alsamixer. If you want to stop the playback before the end of the file, use <control>-C.
Similarly, you can use the arecord command to capture or record input. A command like
arecord -d 5.0 -t wav -f dat gotcha.wav
should make a recording five seconds long into a new wave file called gotcha.wav. The extra settings here are that -d specifies how many seconds to record, -t wav tells ALSA you want a wave file, and -f dat says you want a stereo 16bit/sample recording at 48k (the ‘Digital Audio Tape’ or DAT standard). You can use these commands to check if you are playing or recording via the sockets or connections you want. If they don’t work, experiment again with alsamixer to try and decide which settings are the ones you require.
Unless you specify otherwise, aplay and arecord use the current ‘default’ playback and capture connections. These may not be the ones you expected. To investigate, the commands have a few tricks up their sleeve to help you...
I’ll use arecord for the sake of example, but you can use aplay in a similar manner for investigating playback. If I use the command
arecord -l
(note the last character is a lower-case ‘L’) I get the response
**** List of CAPTURE Hardware Devices ****
card 0: Intel [HDA Intel], device 0: ALC888 Analog [ALC888 Analog
Subdevices: 1/1
Subdevice #0: subdevice #0
card 0: Intel [HDA Intel], device 2: ALC888 Analog [ALC888 Analog]
Subdevices: 1/1
Subdevice #0: subdevice #0
This tells me the laptop has one soundcard (card 0) which offers two input or capture subdevices. One is card 0, device 0, subdevice 0, the other is card 0, device 2, subdevice 0. When capturing input I can specify which one to use. To do this I alter the command to something like
arecord -D hw:0,0,0 -d 5.0 -t wav -f dat gotcha.wav
where the added -D hw:0,0,0 will tell arecord to try reading input from card 0, device 0, subdevice 0.
The -D (note upper case) specifies the audio Device to use – hence the upper case to distinguish it from -d which specifies the duration of a recording. I could try either hw:0,0,0 or hw:0,2,0 and see which of them works for any particular physical input connection. In each case the hw: means ‘hardware’ and represents as direct a connection to the audio hardware as possible. By checking I established that, for my laptop, hw:0,0,0 corresponds to the ‘Capture / Input Source’ columns shown by alsamixer and hw:0,2,0 corresponds to ‘Capture 1 / Input Source 1’.
The above reveals an example of one of the details that can easily trip up the innocent user. The hardware in my laptop only provides two capture streams from the audio card into the rest of the computer. But there are actually three input sources – ‘Mic’, ‘Internal Mic’, and ‘Line’. Two being physical sockets I can feed electronic signals into. The other, a microphone in the laptop. Alsamixer lets me choose which source to attach to each alsa ‘Capture’ stream. But the result is that at least one source is left unconnected! Using alsamixer I can decide, of course, which one is to be ignored. But if I didn’t know this can happen I might find installing a distro on a given machine meant some inputs or outputs mysteriously didn’t work for reasons I didn’t understand. Fortunately, once we know how to use alsamixer we can choose the inputs and outputs we prefer.
When you can play and record audio using aplay and arecord you know that the computer’s basic sound system is working. Any problems then should be down to user-software either not being set up correctly, or failing to interface properly with ALSA. To avoid problems in that area I strongly recommend choosing software that provides a clear option you can set to connect directly to ALSA and bypass Pulse audio, Esound, etc, etc. This can avoid a lot of muddle and annoyance as too many cooks spoil the broth!
If you want to know how to setup and take control of how your computer plays audio, try the next page Taking the ‘alas’ out of ALSA. That explains how to use the aplay command and a simple file added to your home directory to get the music emerging from the sound hardware you prefer.
2300 Words
Jim Lesurf
12th Feb 2013