More music into your computer!


In recent years I’ve had a number of conversations with people who wanted to make digital file copies of their LPs, analogue tapes, etc. Once done, they can store the LP safely and enjoy the music without having to repeatedly risk damage or wear. Initially, most discussions centred on large collections of old and loved LPs. But as more and more new LPs are being sold I’ve also found a growing trend for people to buy a new LP and then want to make a ‘high resolution’ copy they can listen to when spinning the LP isn’t convenient. So I suspect that the number of people wanting to make their own digital file copies is growing.

Almost everyone I spoke to planned to use the ‘line inputs’ on an internal soundcard of their computer to make their digital recordings. Alas, as most audiophiles will know, general purpose internal soundcards that come with standard home ‘PCs’ tend to be lousy, and it is almost impossible for most domestic users to check their quality. So I decided it was time for me to investigate USB Audio devices which can be used to make digital recordings. The aim being to establish the kind of technical quality on offer and to see if I could find something suitable I could suggest...

Since I tend to talk to people who use Linux and RISC OS at least as often as Windows and MacOS I also wanted to find devices that comply with the published USB Audio transfer standards. Hence I ruled out fancy devices that require “Windows-only” drivers. To be honest, as an engineer I’m wary of the need for magic ‘drivers’ whose details are hidden from the user. If the designer was too lazy or dumb to be able to comply with the standards, should I trust them to deliver good quality? And even if they felt they had a good reason to ignore the standards, what happens when you upgrade or changes your OS or buy a new machine? Might you then lose the ability to use the device? Either way, my personal view is that it is safer and wiser to stick with openly defined standards.

Alas my quest was hampered because many of the makers and vendors I contacted simply ignored my questions about their devices. So in many cases I can’t tell you if a given USB device ‘just works’ or not. Indeed, from some replies I got I’m not clear if the makers know either! However I did narrow down onto three examples of devices. I’m sure there are other devices as good or better. But I can’t tell if I the manufacturer won’t even reply when asked.

The three devices I tried were the Behringer UCA202, the Behringer UMC202, and the Focusrite Scarlett 2i2. (I should at this point thank Keith Howard for suggesting Focusrite as a decent manufacturer worth trying.) Here I’ll concentrate on the behaviour of these devices as analogue audio capture/recording devices. But they all have headphone and line outputs so can be used for listening to audio. All three devices provide a volume control for their headphone output. And this can be used either to listen to audio played via USB or to monitor what is being captured. All three devices are powered via the USB connection, so can be used with a laptop as a portable recorder if required.

The UCA202 is one example from a range of four different UCA-series devices that look pretty similar. They each have four RCA/phono sockets and will record and playback stereo. The Behringer UCA series is clearly aimed at ‘home audio’. Some of the UCA devices will apply RIAA correction whilst recording. However I take for granted that any serious audiophile will already have a better RIAA LP preamp that they’d prefer to use. Hence I chose the UCA202 which simply has ‘line level’ inputs for recording. One interesting feature of the device is that it also has an optical SPDIF output which may be useful in some circumstances.

UCA202sockets.jpeg - 194Kb
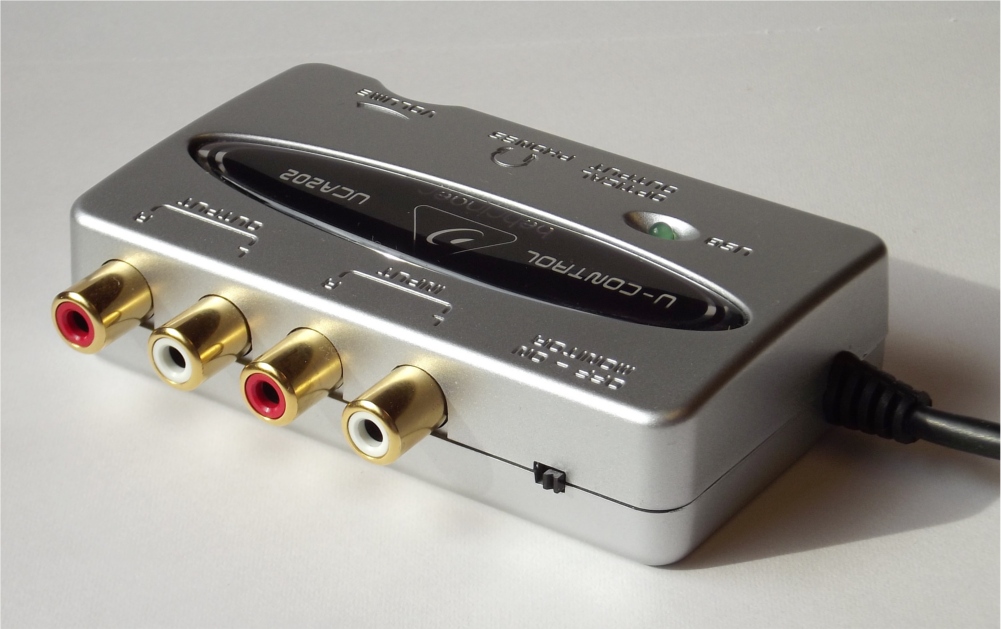
Phono socket side of Behringer UCA202


UCA202phones.jpeg - 170Kb
Headphone and SPDIF side of UCA202

The UCA202 will play and capture 16bit and 8bit samples in stereo or mono at 32k, 44.1k, and 48k sample rates. Hence it is limited to a maximum of 48k / 16bit. It will also capture at various lower sample rates down to 8k samples/sec. Overall, it therefore behaves pretty much like an old fashioned non-audiophile ‘sound card’. However when capturing 48k/16bit stereo it showed a THD of only 0.008% for signals at the -1dBFS level. The maximum input level the device would accept without clipping was about 1.25Vrms, and the noise background was at -81dBFS. This is hardly state-of-the-art, but better than many internal soundcards, and it can be bought for around 25 pounds. So may be useful for some undemanding source material. Its main advantage is that it is, small, convenient and works with no fuss.

If you were to look at the Behringer UMC202 and Focusrite Scarlett 2i2 in a shop or on a seller’s webpages they would appear fairly similar in what they offer. Each has two analogue input channels with individual gain controls. The inputs are via ‘combination’ XLR + 1/4" jack sockets and can accept balanced input from microphones, ‘line’, and ‘instrument’ sources. The XLRs are for microphone input. The jack sockets can be switched between ‘line’ and ‘instrument’. This alters their sensitivity and input impedance. Analogue output is via another pair of jack sockets on the rear of each device. These outputs have their own front-panel gain (volume) control which acts independently of the headphone output which has its own separate gain control.

On Balance.

Most home audio equipment uses ‘unbalanced’ analogue interconnections. This is usually based on lengths of coaxial cable terminating in phono (RCA) plugs. The outer screen makes a ground or zero voltage connection between units. This means that although signal current may flow in the screen, the screen’s voltage stays at about zero volts. The signal voltage is then conveyed using the inner, central, wire. However most studio equipment tends to use ‘balanced’ connections. These have three wires, and typically use 3-pin XLR connectors or TRS (tip-ring-sleeve) 1/4" jacks.

For such balanced connections the signal appears as a difference in voltage between two of them with the ground (0 Volts) level carried separately by a third wire. Balanced outputs therefore tend to produce two output voltage patterns, one being a mirror image or inverse of the other. Balanced signal inputs detect the difference in voltage between these two signal wires and try to ignore the ground potential. Such balanced arrangements can help a system to reject unwanted interference or hum. Hence may be very useful when low level signals are being carried over long connections in an electronically ‘noisy’ environment.

In practice the two signal wires of a balanced connection are often called the ‘hot’ and ‘cold’. The ‘hot’ (+ve) wire carries the audio signal pattern and the ‘cold’ carries the opposing voltage.

A real complication here is that such balanced system may or may not ‘float’. In theory all that should matter is the difference in voltage between the ‘hot’ and ‘cold’ wires. But in practice it is common for a device to apply voltages which are roughly equal and opposite with respect to ground (0 Volts). So when an output device is applying , say, plus 1 volt to the ‘hot’ wire it will apply minus 1volt to the ‘cold’.

adaptors.jpeg - 38Kb

All of this means we encounter a clash of cultures when wanting to use ‘small studio’ equipment like the Focusrite 2i2 and Behringer UMC202 with most hifi systems. We need to employ adaptors to connect the different kinds of equipment. It can also mean that an adaptor arrangement that suits one situation may not suit another. So some experiment and care may be required to determine the best approach when combining ‘studio’ and ‘home hifi’ equipment!

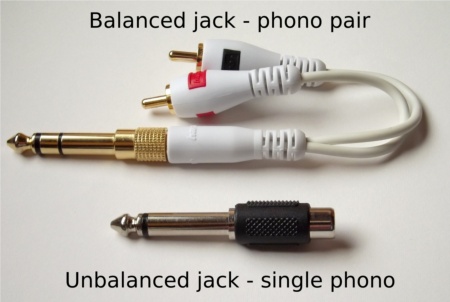
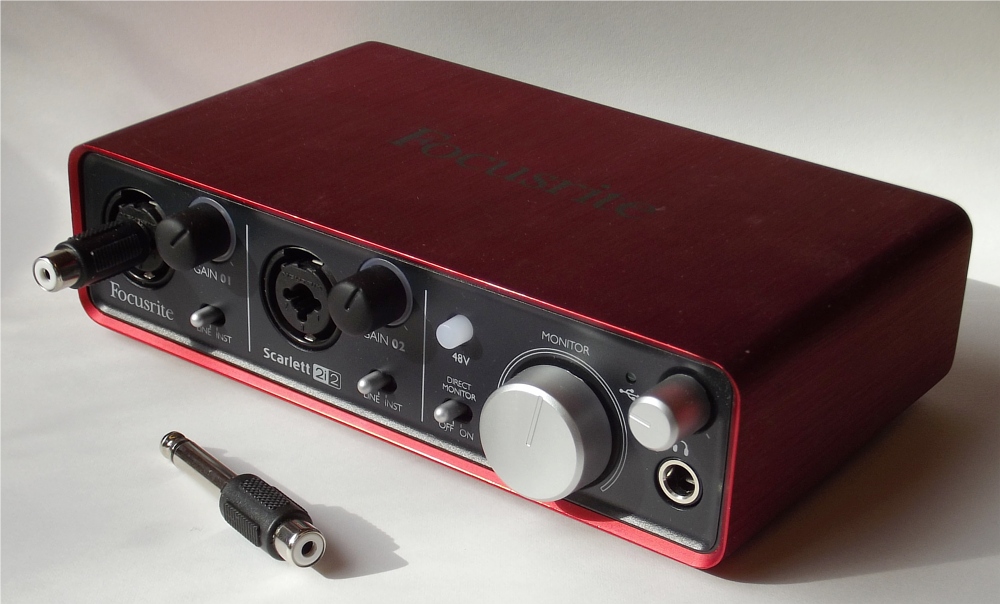
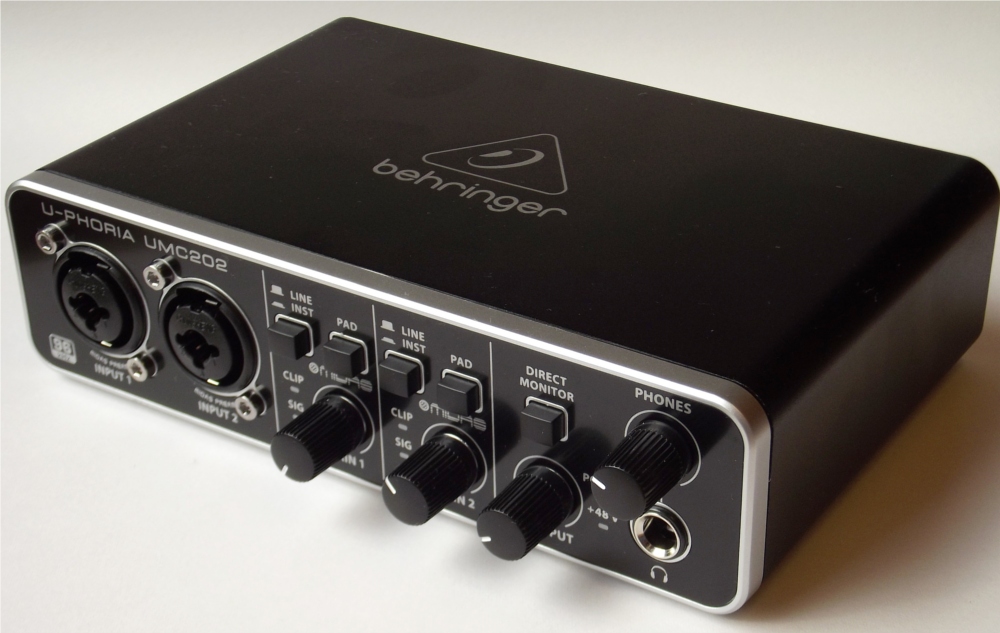
Fortunately, the 2i2 and UMC202 use ‘combination’ connectors for their inputs – XLRs for microphones, with a central socket for 1/4" jacks to input ‘line’ level from other equipment as well as ‘instrument’ input from, say, an electric guitar. Even better, the inputs will accept 1/4" TS (tip-sleeve) ‘mono’ jacks. These link together the ground and ‘cold’ connections at the input and let you use the inputs for a balanced input signal.

jacks.png - 23Kb

For my tests capturing and recording audio I used 1/4" TS unbalanced jack - single phono adaptors, one adaptor per channel. This essentially gave the studio USB ADCs a conventional (for hifi) phono socket unbalanced input. The units seemed quite happy with this and I got the results I report. However it is possible that I might have obtained better results if I had hifi equipment that fed true balanced 3-wire signals into the ADCs.

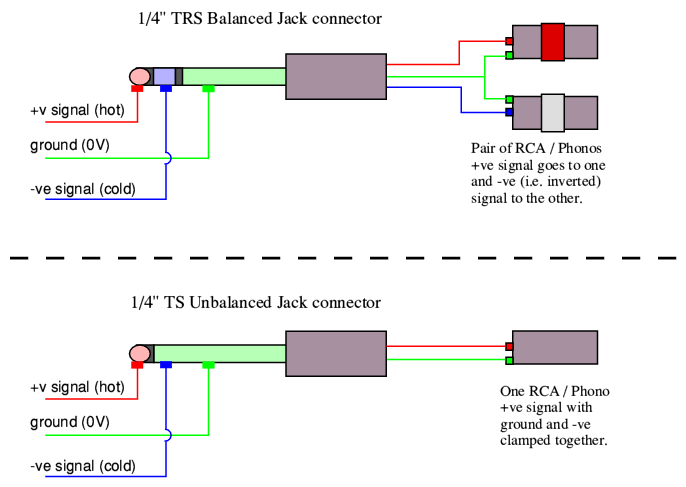
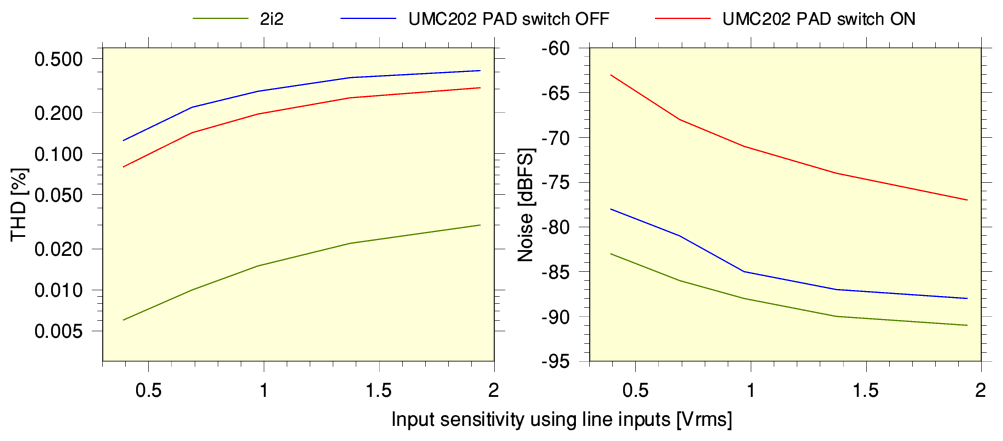
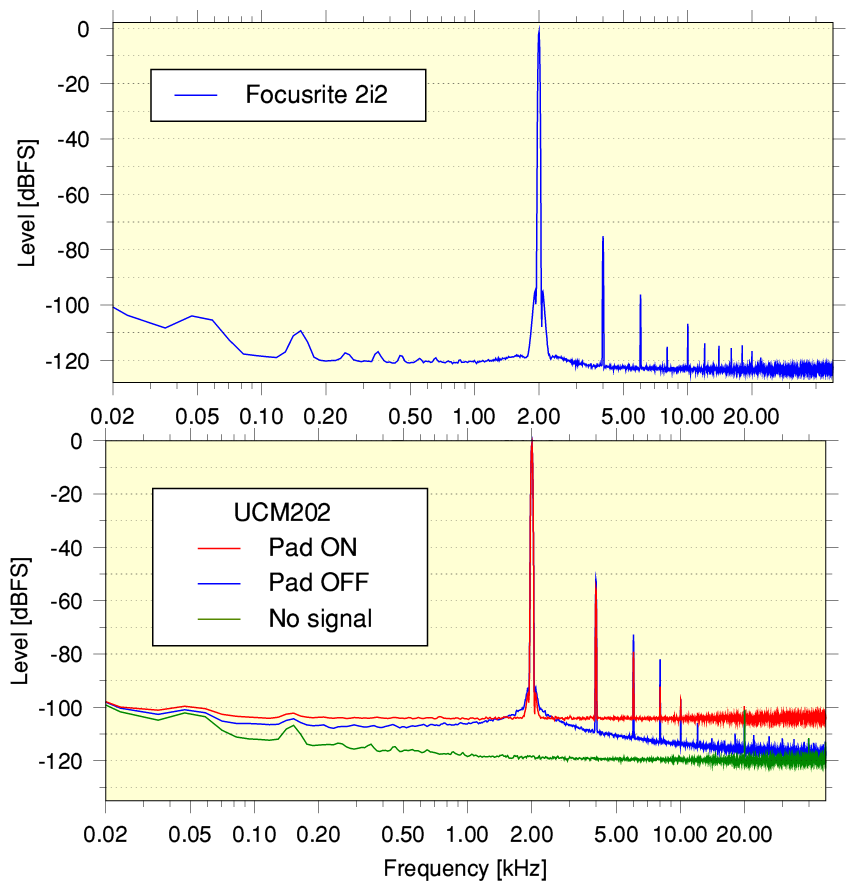
I did also quickly test using the 2i2’s line outputs. Both the 2i2 and UMC202 provide balanced output signals via a pair of TRS jack sockets. I tried two different adaptor arrangements when testing these outputs. One was to use TS unbalanced adaptors of the same kind as I used for inputs to the ADC. The other was to use TLS adaptors that gave the +ve and -ve signals on two separate phonos per channel.

The balanced outputs from some devices may not be happy to have their -ve (‘cold’) output shorted to ground. So using a TRS jack and just one of the phonos (shown above with a red sleeve) to take the +ve output may be advisable in some cases, leaving the -ve (‘cold’) unconnected. However that may not work with a true ‘floating’ output using internal signal transformers. For those you’d need to use the TS-phono adaptors that ties the -ve to ground to get an unbalanced output for home hifi equipment. So the choice of the adaptor method will depend on the device you are using. In practice, though, I found the 2i2 outputs worked quite happily using either arrangement.


For my tests I used 1/4" jack-phono adaptors to connect unbalanced analogue input signals for capture or recording. All measurements were done with the input switches set to ‘line’ rather than ‘instrument’ as that was most appropriate for home audio line-level connections. The devices seemed to work fine using this arrangement which means they should be suitable for use in a conventional home audio setup based on RCA/phono cables and unbalanced coax interconnecting cables. That said, it is possible you may get better performance if you have a hifi system that uses balanced connections, but I didn’t test this situation.

2i2front.jpeg - 218Kb
Front of Focusrite 2i2, also showing the jack-phono adaptors I used.

Both devices will capture and play 24bit samples (using 4 bytes per sample for the USB transfers). And will work at sample rates of 44.1k, 48k, 88.2k and 96k. This makes them quite different to the UCA202. They are clearly aimed at the small or home studio market, and at musicians and people who want a portable and simple computer-based recording system.


graph1.png - 28Kb
THD and Noise for various gain settings

Since the devices have input gain controls I tested their behaviour by applying various input signal voltages while adjusting the gain so that the result was always recorded at -1dBFS. The graphs show the results. For the purposes of my tests the sensitivity represents the input sinewave rms voltage that would give full size (0dBFS) recording at that input gain control setting.

Both devices have indicator LEDs. These light up green to show the presence of an input signal, or red to warn that the gain is too high and the recording may be being clipped. The 2i2 indicators show green for signals above -25dBFS and red for 0dBFS. The UMC202 shows green for signals above -40dBFS and red for above -2dBFS. The actual range of sensitivity is greater than shown by my distortion and noise measurements. With the input gains wound fully clockwise the sensitivity for both devices was about 25mV. With the controls fully anticlockwise the sensitivity was about 7 Volts rms for the UMC202 and about 2.5 Vrms for the 2i2. However when used with a decent home audio system the range from a few hundred millivolts to 2 volts is probably where the gains will normally be set. So that’s what I concentrated on for my tests.

UMC202front.jpeg - 227Kb
Front view of Behringer UMC202.

The UMC202 also has a ‘pad’ switch for each of its inputs. These change the sensitivity by about 20dB (factor of 10 in voltage) when depressed. This makes it easier to accurately set the input gain for large line-input signals. But it also increases the noise by about 15dB. Overall, in terms of both noise and distortion the Focusrite 2i2 looks to be the better performer. Its input gain controls also operated more smoothly and were easier to adjust to get a required level. Note that these results were taken using the devices to record 24 bit samples at 96k sample/sec. The background noise was fairly flat over most of the recorded spectrum up to 48kHz. So in practice the amount of background noise in the audible range to about 20kHz was about 3 - 4dB lower than shown in the graph.

graph2.png - 61Kb
THD+ noise spectra

An interesting difference between the two devices became apparent when I looked at the spectra of recordings made with an input 2kHz test tone and the gains adjusted to give a level around -0.5dBFS. With the UMC202’s input pad off, the background noise increased quite noticeably when the 2kHz input was applied. (Compare the green and blue lines in the UMC202 spectra.) I am not certain why this occurred. It may be that the ADC used in the UMC202 isn’t working as linearly as the one in the 2i2. A lack of uniformity in the ‘steps’ between the samples levels can cause a form of distortion that gives rise to a sort of ‘modulation noise’ similar to that caused in analogue tape recordings by magnetic domains in the tape coating. Alternatively, it may be that the presence of signal is making the ADC’s internal amplifier or convertor more sensitive to noise from its USB 5Vdc power supply. Whatever the reason, the result is that the background noise seems to rise above the level measured when no input is being applied.

Whilst on the topic of noise I should add that I did find that the choice of the USB power supply used did affect the results I obtained. All the devices I tested draw their power from the USB connection. I got the lowest noise when using either a laptop on battery power or a particular external USB hub + ‘wall wart’ PSU. So if you want the best results it may be a good idea to experiment with different arrangements for powering the USB ADC.

Overall, each of the devices seemed to have some advantages, but my personal preference was for the Focusrite Scarlett 2i2. All the devices worked easily with RISC OS and Linux, and I expect they will also do so with Windows and Macs. But I found the 2i2 easiest to use and gave what seemed to me to be the best results. I’m sure better devices exist, though. I was originally hoping to include at least one 192k/24bit USB ADC in my tests. But for every candidate I identified I either got no response from the maker at all, or was told it wasn’t USB audio class compliant. So, if you find a good example which I can test and is USB audio compliant, please let me know!

The USB connection details for the devices I tested are described here.

Jim Lesurf
26th Mar 2014


ambut.gif - 3891 bytes next.gif - 2248 bytes