In my previous two Investigations into LP I produced a simple model which predicted the maximum signal levels we might expect from a Vinyl LP, and then collected some measured results. The measured velocities agreed neatly with the theory. But the measured acceleration levels seemed much lower than predicted. So what might explain this discrepancy? Can we get an explanation by taking a closer look at the vital link – the shapes of the groove and playback stylus? What additional restraints might these impose on the signals?
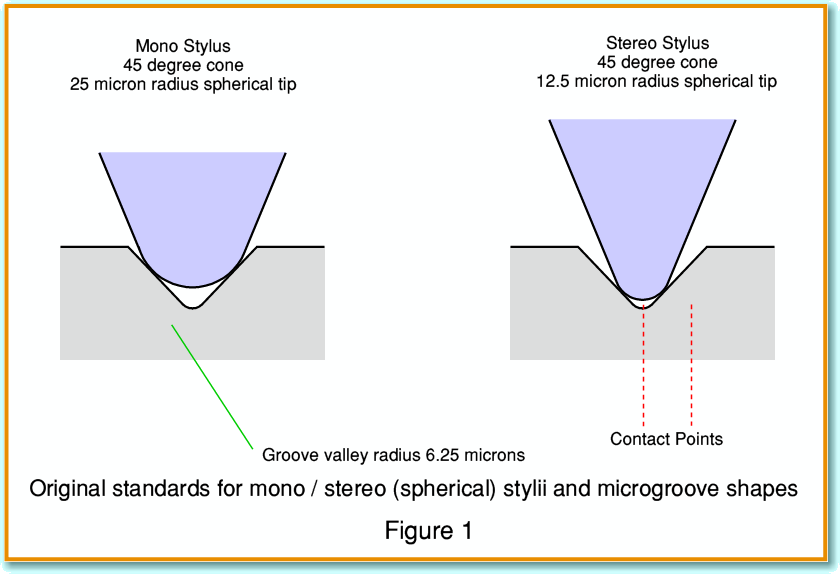
Figure 1 illustrates the shapes of the original stylii and groove as they were defined back in the 1950s and 1960s when the stereo LP became a commercial reality. The drawings in Figure 1 are to scale, and show the view looking along the groove. The groove is the familiar ‘Vee cut”, but the original microgroove specification was that at the bottom of the groove there would be a rounded ‘valley’ with a radius of about 6·25 microns. (Note that all the early dimensions were in thousandths of an inch, but I am converting them all to metric as that makes them easier to deal with when considered along with other quantities like velocities in cm/sec!)
The original microgroove LP stylus was nominally defined to be a cone with an included total angle of 40 - 50 degrees, with a spherical tip of 25 microns radius. The stereo stylus was defined to have a smaller tip radius of half the mono value – i.e. 12·5 microns radius. In reality, though, the actual details of both the LP groove and the stylus tip would vary from one maker to another, and even one LP/stylus to the next. Some stylii were also made with tip radii midway between 25 and 12·5 microns in order to behave more like a traditional stylus when playing monophonic LPs.
Comparing the mono and stereo stylii shown in Figure 1 we can see that the contact points for the stereo tip sit lower down the groove walls as a result of the smaller tip radius. This gives more vertical distance for upwards vertical modulation. The mono stylus sits relatively close to the tops of the groove walls, and it would be difficult for it to track any vertical displacements without popping out of the top of the groove. Note also that – because of the way the spherical tip sits in the groove – the distance between the two contact points isn’t equal to double the value of the tip radius. Instead, the contact points are spaced apart by a distance that is just over 40 percent more than the tip radius.
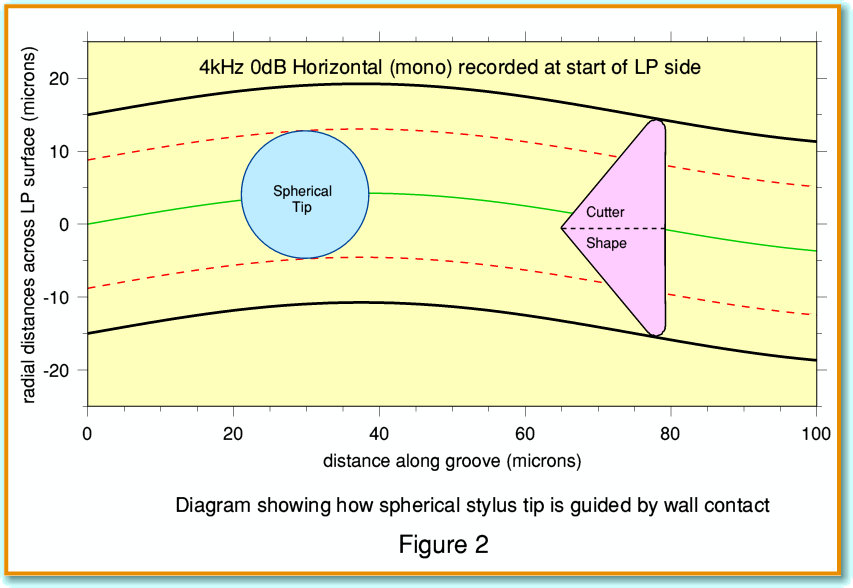
Figure 2 represents what we might see if looked directly downwards into the groove and could see the stylus tip. Here the blue circle represents the cross-section though the spherical tip at the depth where it contacts the groove walls, and broken red lines show how the intended contact points follow the walls. For this scale illustration I assumed the recording is of a 4kHz sinewave tone whose amplitude corresponds to the RIAA 0dB level, and that the modulation is in the horizontal plane. i.e. the output should be the same from both loudspeakers, and at the same level as the 0dB 1kHz reference once RIAA correction has been applied. The figure also shows a cross-section though the shape of the cutter used to cut the groove. The cutter is essentially a triangular chisel which has a flat vertical front face. But the cutting edges are not absolutely sharp. Instead they have a radius of a few microns. Viewed from the front, the cutter forms the shape of the groove, including the valley rounding at the bottom.
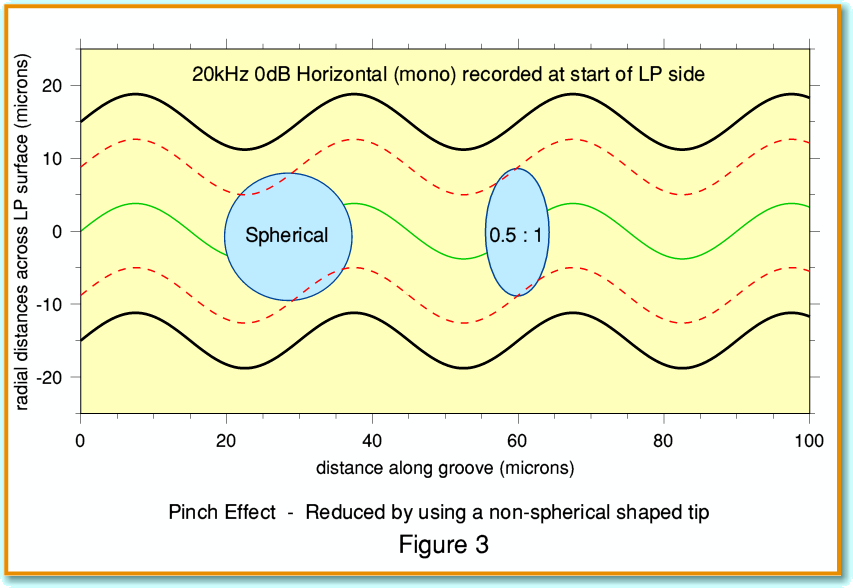
Figure 3 is similar to Figure 2, but now the signal is a 20 kHz tone at the 0dB level. This means that the distance between the peaks of the cycles of wall displacement are much closer together and the curvature is much more pronounced than the 4 kHz example. Looking at this example we can quickly see that there is a problem. Measured along a direction towards the center of the LP, the two broken red lines that show the intended contact points are always the same distance apart everywhere along the groove. However, because of the shape of the stylus, its actual contact points won’t always share this line to the center of the disc. As the result the contact points seem to the stylus to ‘pinch together’ when the modulation velocity is high. This shows up in Figure 3 where we can see that the broken red lines both seem to come into the circle that represents the spherical tip.
In practice what happens is simple. The stylus ‘rides up’ in the groove until a part of the sphere closer to the tip is in contact with the walls. In effect, the circle of the stylus in contact gets smaller to suit the modulation. This behaviour is, for obvious reasons, called “Pinch Effect”. It allows the stylus to go on playing the groove, but it is actually bad news. The cause is that the playback stylus differs in shape from the cutter. The unwanted vertical movements produced by pinch effect are a source of distortion Of course, if we were replaying a monophonic LP we could deal with this problem by pressing a ‘mono’ button (if we have one!) on our preamp. This will then suppress any output caused by the unwanted vertical movements. Alas, that isn’t much use when we want to listen to a stereo LP in stereo...
We can see how it may be possible to reduce the effect when using a stereo system by looking again at Figure 3. In addition to our original spherical stylus I have also shown another one with an elliptical tip. For the sake of illustration I’ve drawn one whose aspect ratio is 0·5:1. In effect, I have imagined simply squashing our original stereo spherical stylus by a factor of two along the direction of travel. If you compare this with the sphere you can see that this significantly reduces the amount of pinch effect. This is one of the main reasons elliptical – and other types of non-spherical – stylii became popular.
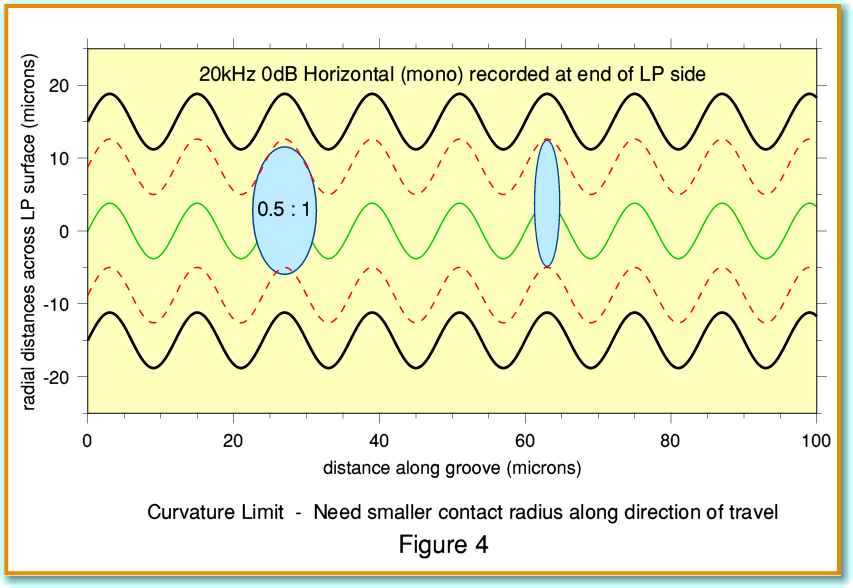
This isn’t the only advantage of using a non-spherical stylus shape, as can be seen from Figure 4. Here I have used the same modulation as Figure 3, but now recorded at the end of the LP side where the cutting velocity is at its slowest. The result is to scrunch up the waveform with the results shown. Here we can see another problem. The ‘corners’ of the curves in the groove walls now have quite a sharp curvature. Too sharp for our 0·5:1 ellipse to reach completely into each corner. To deal with this we have to make the curvature of the parts of the stylus that contact the walls even tighter. This is represented in Figure 4 by the second ellipse which has a 0·1:1 ratio, and now can just fit into the corners of the wall modulations. In fact, the curvature of the corners is directly related to two factors – the peak acceleration being applied to the stylus by the recorded waveforms, and the cutting/replay velocity due to disc rotation. We can represent the sharpness of the curvature by the radius of a sphere that would just fit into the corners and manage to reach the parts a larger shape could not touch.
In practice, if you look at the descriptions makers give of their stylii you will see various terms like ‘elliptical’, ‘bi-radial’, ‘line contact’, ‘micro-ridge’, and various names like ‘Shibata’, ‘van den Hul’, etc. In each case the interest is in the shape and size of the contact between stylus and groove walls, and one of the main factors is the effective radius of curvature along the direction of travel. (This is often called the ‘minor radius’ of the shape.) This needs to be small enough for the stylus to reach into the corners of all the bends in the groove walls it encounters.
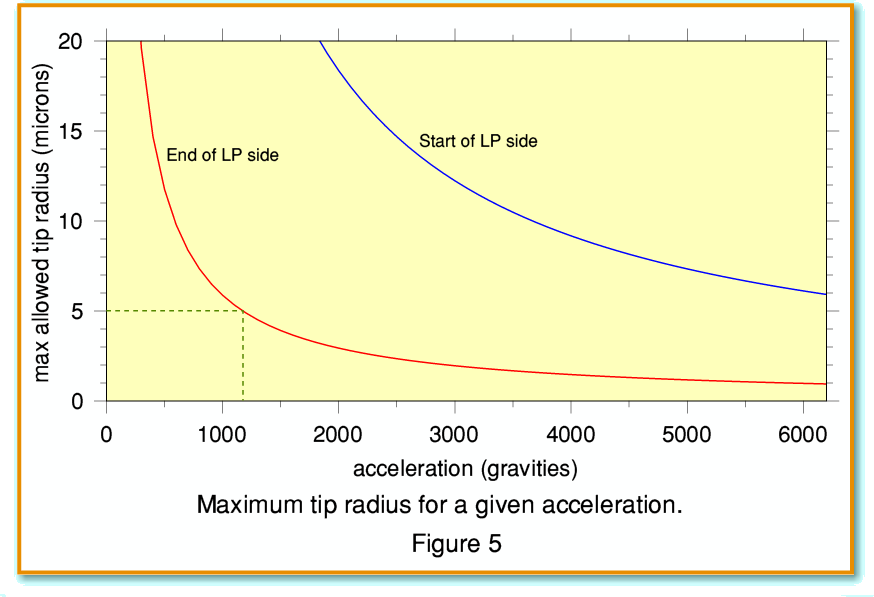
This leads to the question: How small does the tip radius have to be to be able to track a given acceleration? Figure 5 shows the answer to this question. The red line shows the maximum tip radius which would fit into the corners of the modulation at the end of the LP side. The blue line shows the results for the start of the LP side. We can see from this that a tip radius of curvature of around 5 microns would be sufficient to track accelerations up to just over 1000g at any place on the LP. But that we’d need a tip curvature with a radius of only about 1 micron to track the level of over 6000g required for a 0dB 20kHz signal if it occurred at the end of the LP side!
The good news, of course, is that real music has little in common with a 0dB 20 kHz sinewave. Indeed, if the cutter had an edge curvature of the order of 2 microns then it would have had trouble cutting accelerations around 3000 gravities or more (-6dB at 20 kHz) at the end of the LP side. Also, in practice those who cut a given LP may well have taken care not to cut high accelerations because they feared that most users would then be unable to play the results! Looking back at the results in last month’s article we found that the largest peak accelerations observed were around 1000g. By using these results we can now assess what the demands may be on a replay stylus. Here I will take the Shure V15/IIIMR I used for the results in my previous article as an example. In the past, Shure gave a great deal of detailed info on their cartridges, so I can now compare this with the above, and the observed results to see what the various specifications mean in practice. This is useful as a way of seeing what would be required for any other stylus/cartridge to play the same LPs.
Table 1 - Data for Shure V15/III
| Frequency
|
400 Hz
|
500 Hz
|
2 kHz
|
5 kHz
|
8 kHz
|
10 kHz
|
20 kHz
|
| max velocity (cm/s)
|
26
|
30
|
38
|
35
|
30
|
26
|
10
|
| Ref RIAA (dB)
|
+18
|
+18
|
+15
|
+8·75
|
+3·5
|
+0·5
|
-13·5
|
| acceleration (g)
|
66·5
|
96
|
487
|
1120
|
1535
|
1665
|
1281
|
| end-side tip radius (microns)
|
88·3
|
61·2
|
12·0
|
5·2
|
3·8
|
3·5
|
4·6
|
| max tip mass (mg)
|
11·3
|
10·4
|
2·0
|
0·9
|
0·6
|
0·6
|
0·8
|
The top two rows of values in Table 1 are taken from Shure literature and some of the reviews that were published when the V15/III was released. Shure used to publish ‘trackability’ graphs, etc, that showed the peak modulation velocities their cartridges could track. The data shown is for a playing weigh of 1 gram. Knowing the velocity and frequency we can calculate the acceleration required. Then use this to work out the maximum allowed stylus curvature and tip mass which would allow the stylus to perform as specified. Shure themselves claimed that their V15/III stylii had a tip mass of no more than 0·4 milligrams. Their chief engineer of the time also wrote an article that appeared in Hi Fi News[1]. This said that they had surveyed a number of LPs and that the highest accelerations they could find were around 1500g, so they designed the V15 series to track these discs. From the values in the above table we can see that the requirements include a tip mass of less than or equal to 0·6 milligrams and a minor radius of less than or equal to 3·5 microns. If the V15/III stylus had a higher mass or radius it would be unable to perform as specified across the frequency range and right to the end of an LP side.
In fact although the Shure VN35MR stylus for the V15/III had a ‘Micro Ridge’ with a claimed radius of 3·5 microns, earlier stylii had larger contact radius values. For example the VN35E was an elliptical shape with a minor radius of 5 microns. The measurements Shure quoted were often obtained using 45 rpm test discs, and using test tones recorded well away from the end-of-side region. Increasing the rotation rate from 33 to 45 rpm stretches the modulation out along the groove, reducing the curvature of the bends. At the end of an LP side it means that a stylus contact radius of 4·7 microns would allow the V15/III to fully meet its specifications.
And as you can see from Figure 5, if we keep away from the end of the LP side we don’t need such a small tip radius. So although the VM35MR shape might have coped with 1500g accelerations right up to the end of side, the VN35E and some of the earlier shapes may not.
Overall, the above tells us that if we wish to be able to play real-world LPs without mistracking we really need a tip mass of around half a milligram or less, and a minor radius of curvature (or equivalent) of around 3-4 microns or less. Larger values may be fine for most of the playing time of most discs, but could run into trouble in extreme cases. In theory, even lower masses and curvatures may seem desirable, but in practice they may only be needed for test tones, not music. Indeed, the cutter used to create the groove shape may have had an effective contact radius of a few microns, so it simply makes no sense to try to reach a stylus radius smaller than this. More extreme modulation may simple never appear on real-world discs of music. Although who knows, maybe it does – at least up until it is played for the first time!...
So although theory tells us we’d need to cope with 6000g and very tight curves to obtain a 0dB 20kHz test tone, the reality seems to be that practical LPs of music don’t normally have modulations which reach such extreme levels. This agrees with the results in the previous article and explains the difference between the theoretical requirements and reality!
Having reached that conclusion, though, I should finish by pointing out that there are some “dogs that did not bark in the night” which I haven’t yet investigated. These are distortion, which I have not looked at in any detail, and the specific problem of the groove wall deforming under the pressures required to accelerate the stylus. It is one thing to be able to play the LP. But something else for the result to have high fidelity! I hope to investigate these sometime in the future.
Jim Lesurf
3rd Dec 2007
[1] Trackability. J. H. Kogen Hi Fi News November 1966 pp 586 - 592
